Solar Payback

My solar testbed has been running for a few months now. In the summer here in Austin I tend to get 700 WH per day, but it does vary. I was wondering what the payback is for my little setup. My panels are just whatever I found on Amazon. Not the best or the worst. Price probably ok at $150.

At 700 WH per day, and using $0.10 per kWH, it comes to about $0.07 per day production. Doesn’t sound like much but thats $25 per year. So I’m looking at about a 6 year payback. Not bad. Of course there are lots of variables. My equipment has a battery, inverter and controller that I’m not including. Also $0.10 per kWH is top tier here in Austin, but that is what we pay. But there are other fees on our power bill that aren’t included, and they are significant these days in Texas. And if you use less electricity the tier and the rate will be lower. Of course the output of the panels will be lower in the winter. But a good ballpark number.

More Solar Data

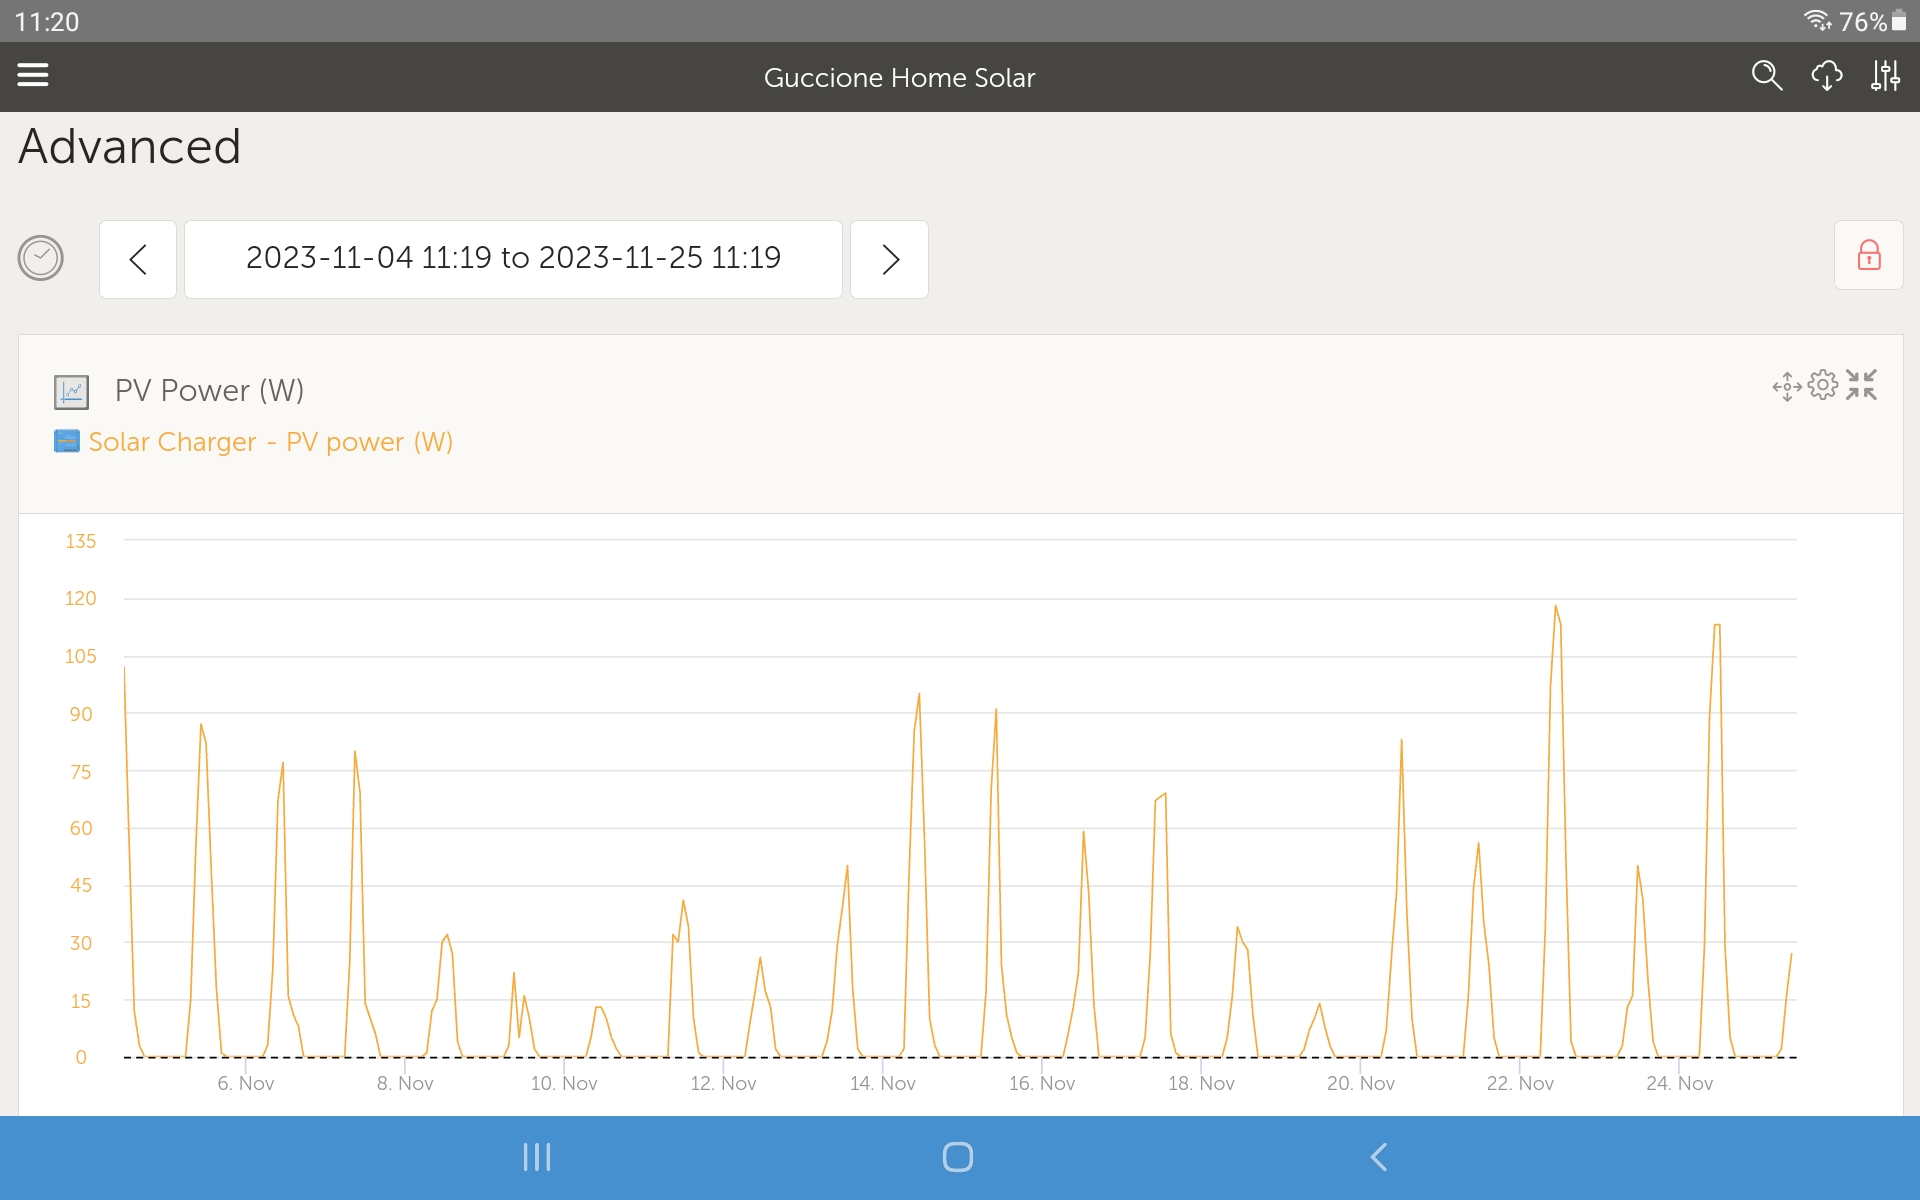
When I put up the solar testbed I realized it wasn’t wven close to a good place for solar panels. It was just convenient. As winter moved in I noticed the angle of the sun was lower than I realized. On November 16 I decided to angle the panels a bit more toward the sun. This led to noticably higher peaks on sunny days.

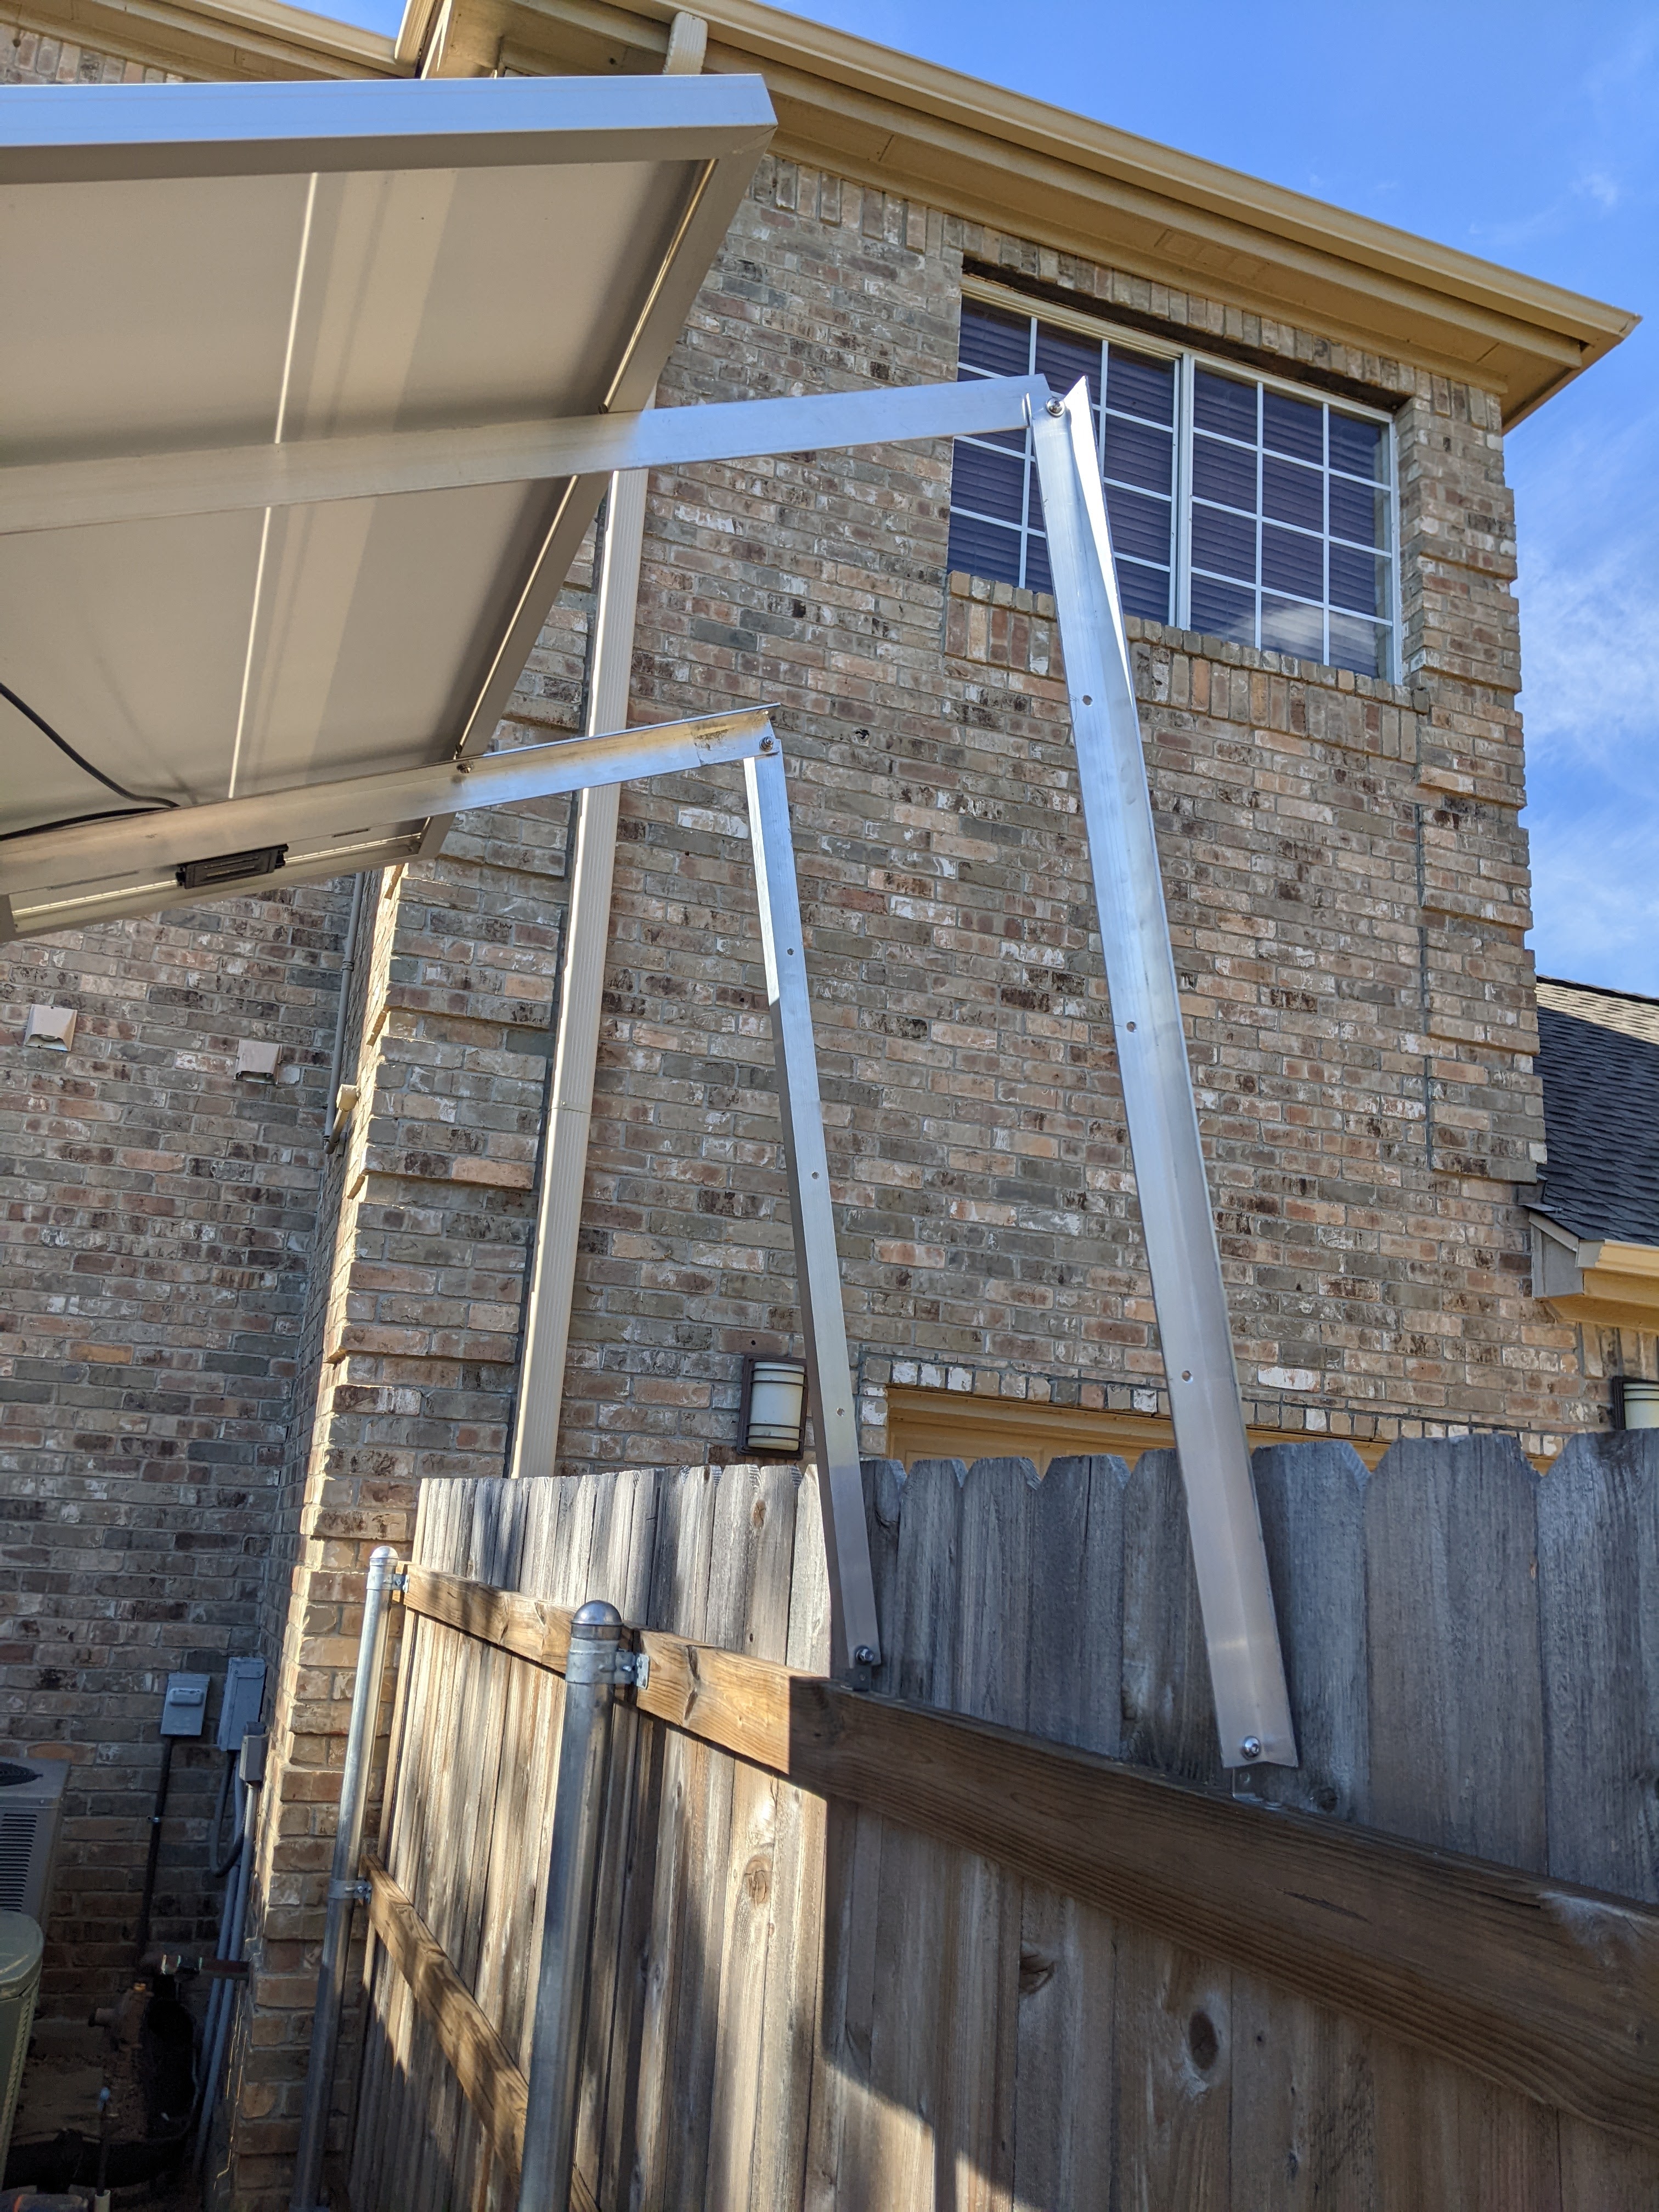
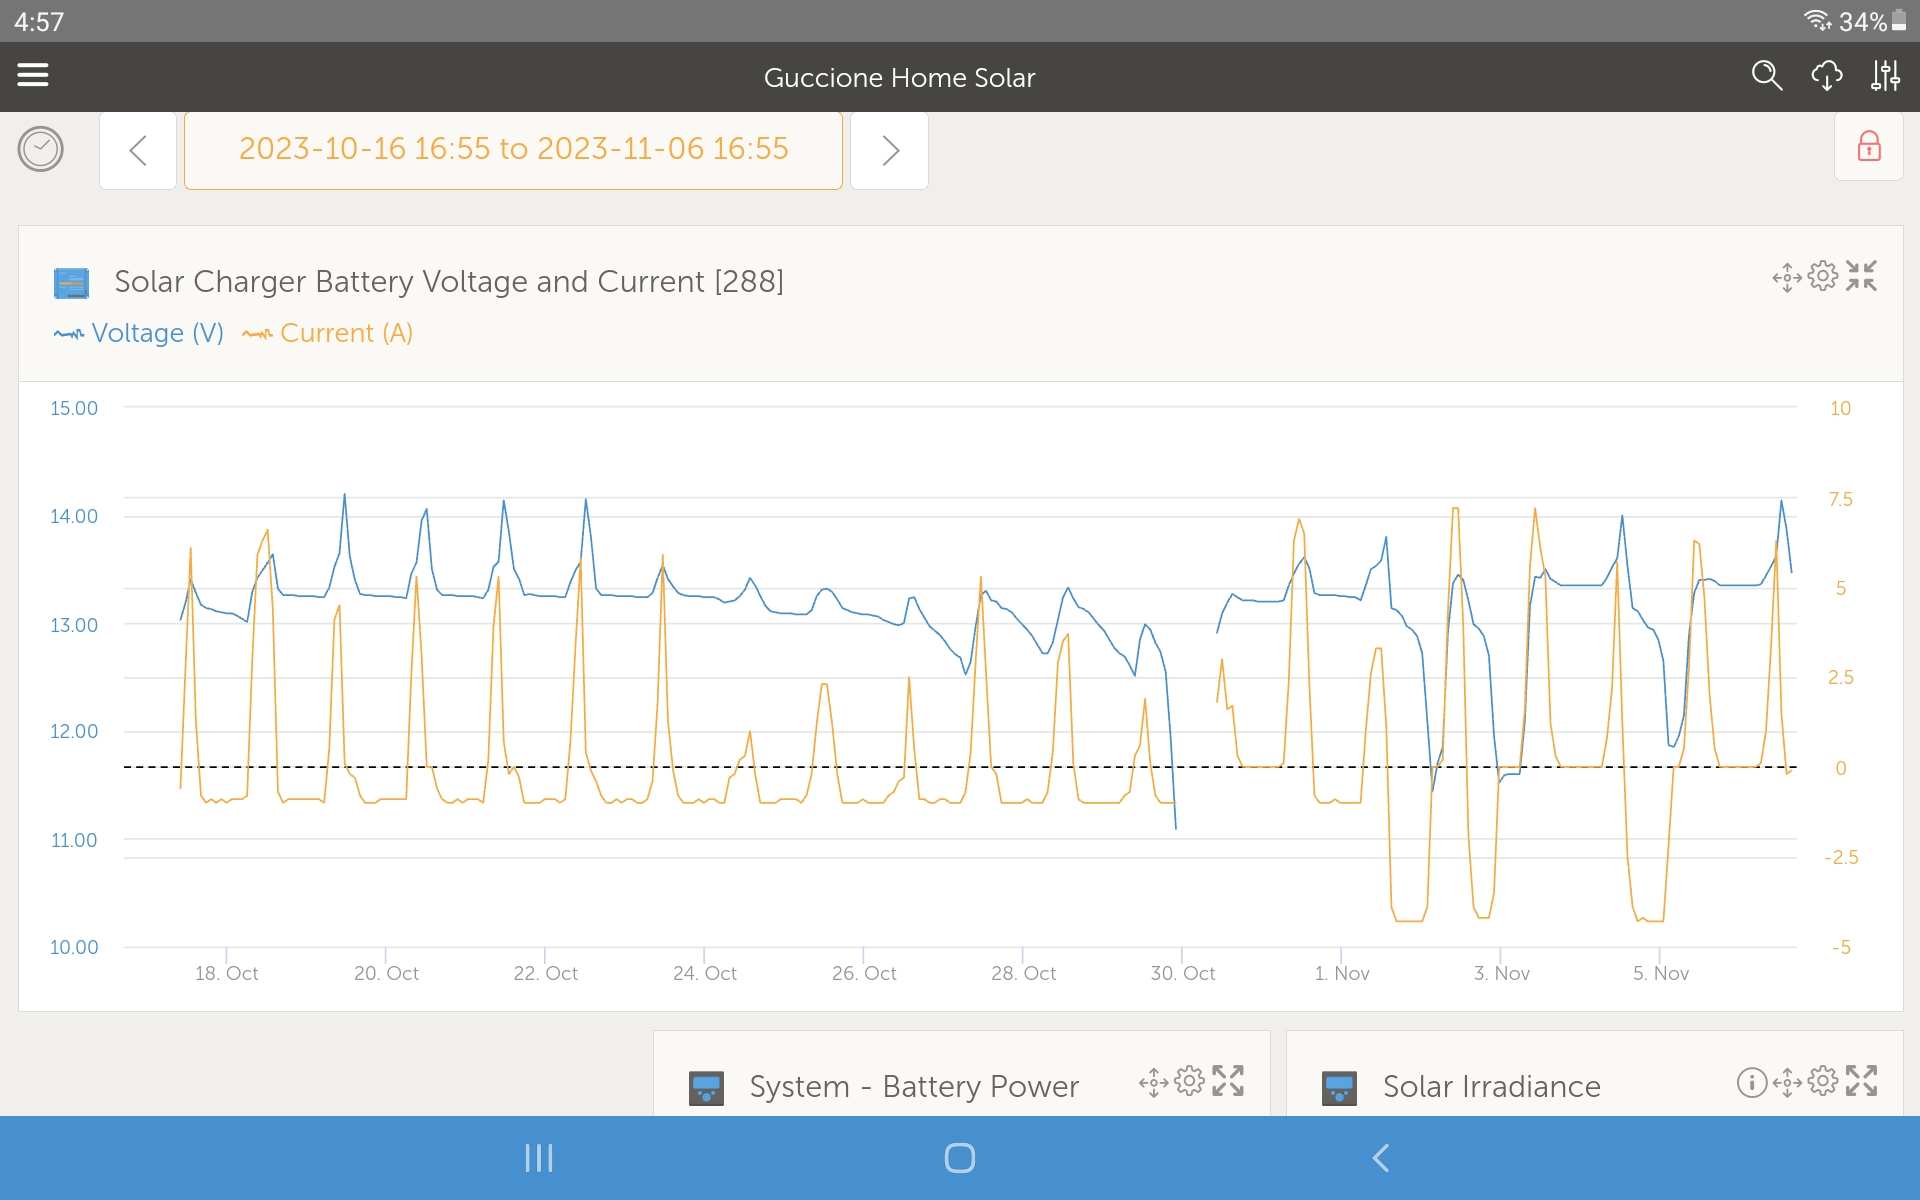
The panels were also close to the east side of the house which put them in the shade most of the afternoon. So I bought an extra 20 feet of wire and moved the panels east a bit. This was on December 7. Unfortunately, many of the days have been cloudy, but the chart below gives the output per day. And even as I moved the panels to get more sun, the days got shorter and the sun lower in the sky. But I still was able to see a new peak output.

Some points. I learned that angles aren’t as important as I expected. In fact, panels that track the sun gets maybe 20% increase in output. Not trivial, but probably not worth the effort in most cases. And since the angle of the sun varies so much over the year (and through the day!) the angle for a fixed panel is just a sort of compromise anyway. So mostly people just go with whatever angle their existing roof is (of course). One thing that I didn’t appreciate was the effect of shorter days in the winter. There are some calculators on line that let you play around with this but the longer days in the summer make a big difference. Finally a good sunny day is really dramatically different than a cloudy day. All of this pushes toward larger panel arrays and larger batteries for going completely off grid, depending on where you live.

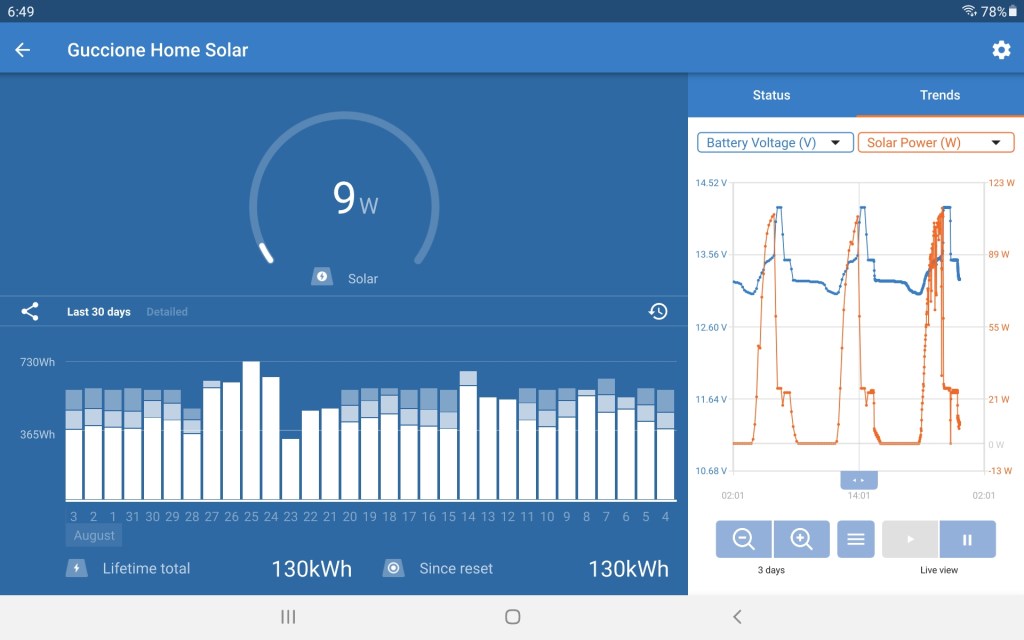
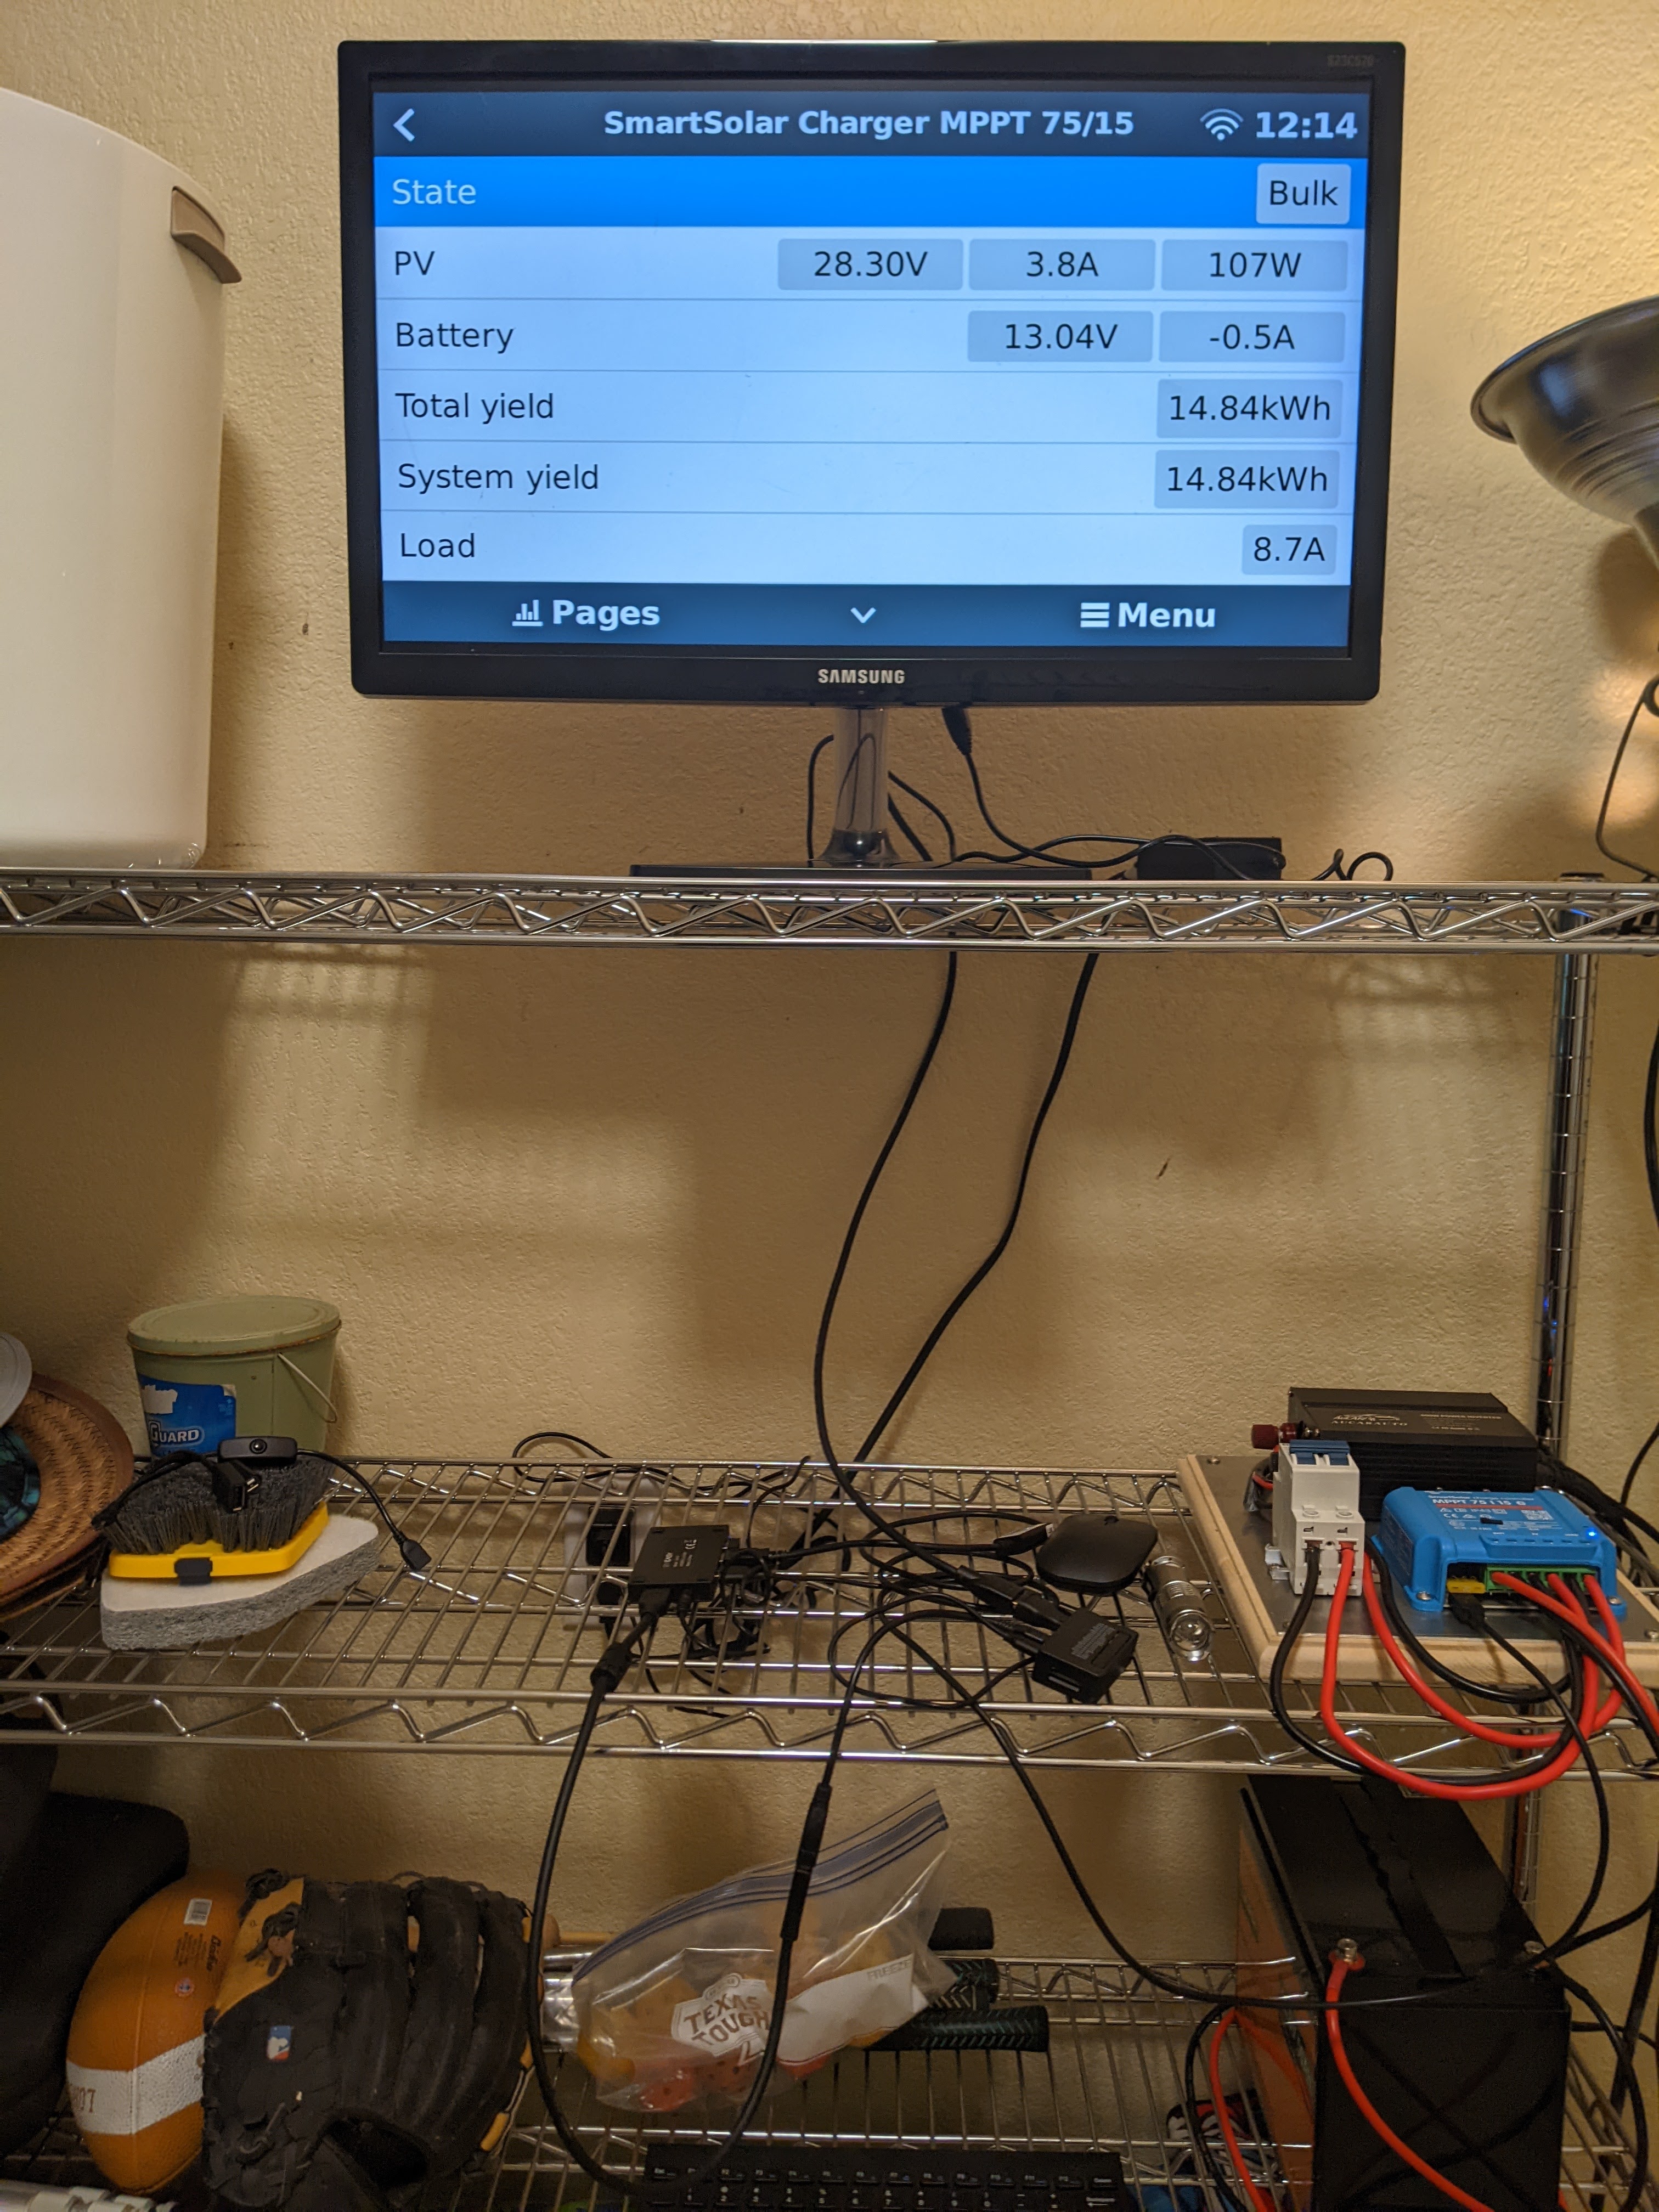
The last bit has to do with the way output is measured. In the graph below the shaded boxes at the top of some of the bars indicate different battery charging modes. So the days without these shaded bits are days the battery doesn’t fully recharge. This also brings up the point that output is just what you use. Unless you completely drain the battery, this isn’t showing the actual (potential) output of the panels. I tried to put some larger loads on sunny days to see what sort of peak I could get, but even that is hard to plan.

LED Lighting and the Energy Transition

I am using a couple of lightbulbs for the test load for my solar testbed. I was using either one or two standard bulbs which consume maybe 10W each. Not much of a load really. I started looking around for something a little bigger and realized there wasn’t much that you can run 24 / 7 that uses much electricity. I happened to have two old incandescent bulbs that weigh in at 60W or so each and they are about the best I can do.

Funny thing is the 10W LED bulb puts out about as much light as the old 60W incandescent. That’s significant. It certainly makes things like home solar much easier to manage. The idea of “keeping the lights on” isn’t such a big deal. The next step, I suppose, is keeping the A/C (or heat) on.

Solar Power and Angles

Below is a graph of the recent output of the solar testbed from the Victron VRM. The last two large spikes are after tilting the panels. None of this was very scientific, with the angle being determined by the available size of the angle iron (five feet, cut in half for two 2.5 foot lengths). I estimate this is about a 22 degree tilt, maybe half of optimum.

Qualitatively there is a significant improvement in output, maybe by a third, on sunny days. The two large spikes are the days before and after Thanksgiving, which we’re full sun all day, with Thanksgiving being mostly cloudy.

The lessons: angle is important. Shady days will produce a bit, but full sun is where the real productivity is. Most home installations won’t have too many choices for angle and the weather is going to be even further beyond our control. But some good parameters to get a feel for.

A Better Angle

I have never really noticed how low in the sky the sun gets in winter here in Texas. With my panels laying more or less flat, the angle the sun hits the panels at is pretty low. So I decided to change the mouting to permit a change in the angle, at least in one direction.

Originally I had just attached the angle iron brackets directly to the fence with deck screws. Simple and sturdy for sure. This week I bought some brackets and two more pieces of angle iron to prop the panels up in a more southerly facing direction. I was hoping for a string of nice sunny days for a good comparison but it it looking like that isnt going to happen. But I expect a noticable change in output.

Some lessons being learned. Location is important. Right now the panels are blocked by the house (and trees) in the afternoon. I could have moved them further away from the house, and I may yet, but this used less wire and was more convenient.

I’m also getting the idea that in some old fashioned way this technology can put you in closer contact with the natural world around us. My first inclination was to think about sizing an array for absolute worst case. But maybe it is simpler to make adjustments to your lifestyle. Don’t do laundry on cloudy days. Wasn’t this how Grandma used to do it?

More Solar Testbed Data

The solar Testbed has been running for a few weeks. I decided to leave an LED light on 24 / 7 just to see things cycle. Maybe 10W for the bulb another 10W for the inverter and logger. Everything is fine until there were a few cloudy days in a row. Eventually the battery fully drained, turning off the logger (the Raspberry Pi was plugged into the inverter).

I turned off the light for a few days and the sun came out and let the battery charge a bit. Expecting sunny days I turned on a larger load, maybe 60W, just to see how this cycled. Also plugged the Raspberry Pi into the wall so logging wouldn’t stop. It seems the controller is set for something called BatteryLife which is used to conserve battery life in lead acid batteries. This keeps the load turned off until the battery gets a full charge, to prevent short cycling. But I have a lithium battery and don’t care so much. I need to change this and try again. Anyway, the light would burn for a few hours in the evening and then turn off sometime in the night, charging again in the morning. But again a string of unexpected cloudy days moved in. Not enough panels + battery to keep a 60W load going full time. Lesson here is being completely off grid might be harder than it looks.

Solar on Cloudy Days

Have been running an experiment on the solar testbed. I kept a regular household LED bulb running 24 / 7 for over a week, just to watch the graphs go up and down. The light draws maybe 10W and the controller maybe another 10W. We have had a long streak of cloudy days and I noticed the light was off this morning. Checking the VRM it seems that it has been off for 12 hours. The inverter is also off. Looking at the graph it seems the battery was gradually drained, then it fell off of a cliff sometime during the night. I’m going to leave everything as is a see what happens when the sun comes back out, perhaps tomorrow.

Update: I had the Raspberry Pi which sends data to the VRM plugged into a USB port on the inverter. Very convenient except that when the battery gets low, the data logging stops. For now I have plugged the Pi into the wall so that logging continues. I suppose once the battery bottoms out there is no real point in logging. I’ll probably plug the Pi back into the inverter when the sun comes back out.

Victron VRM Dashboard

Finally playing around with the VRM Dashboard. Pretty nice stuff. Reminds me of some of the dashboards we used to use to monitor data centers. I did not expect this sort of functionality. Left a single LED bulb on all day and all nigiht for a small load (maybe 10W) and collected about a weeks worth of data. Very flexible with lots of useful canned graphs.

Solar Data in the Cloud

I continue to be impressed with Victrons products, especially their software. I always planned to do some data logging and thought I would have to do a little work to make it happen. Turns out Victron gives you all the pieces you need. I bought a Raspberry Pi zero 2W and flashed it with the free software from Victron to make it a data hub which also uploads to the Victron VRM cloud. Had to buy a USB cable to connect to the Victron controller, but that was really all. Played around on the desktop with a monitor and keyboard set up the WiFi, added the VRM info and moved everything down to the garage. Plugged in everything (monitor, keyboard) but it wasn’t really necessary. It synced with the controller and everything worked as expected. How often does that happen?

i made my site public so anyone can go have a look at my system status. It’s on their VRM share site at Guccione Home Solar. You can also find it on the Victron World site (I’m in Austin, TX).